


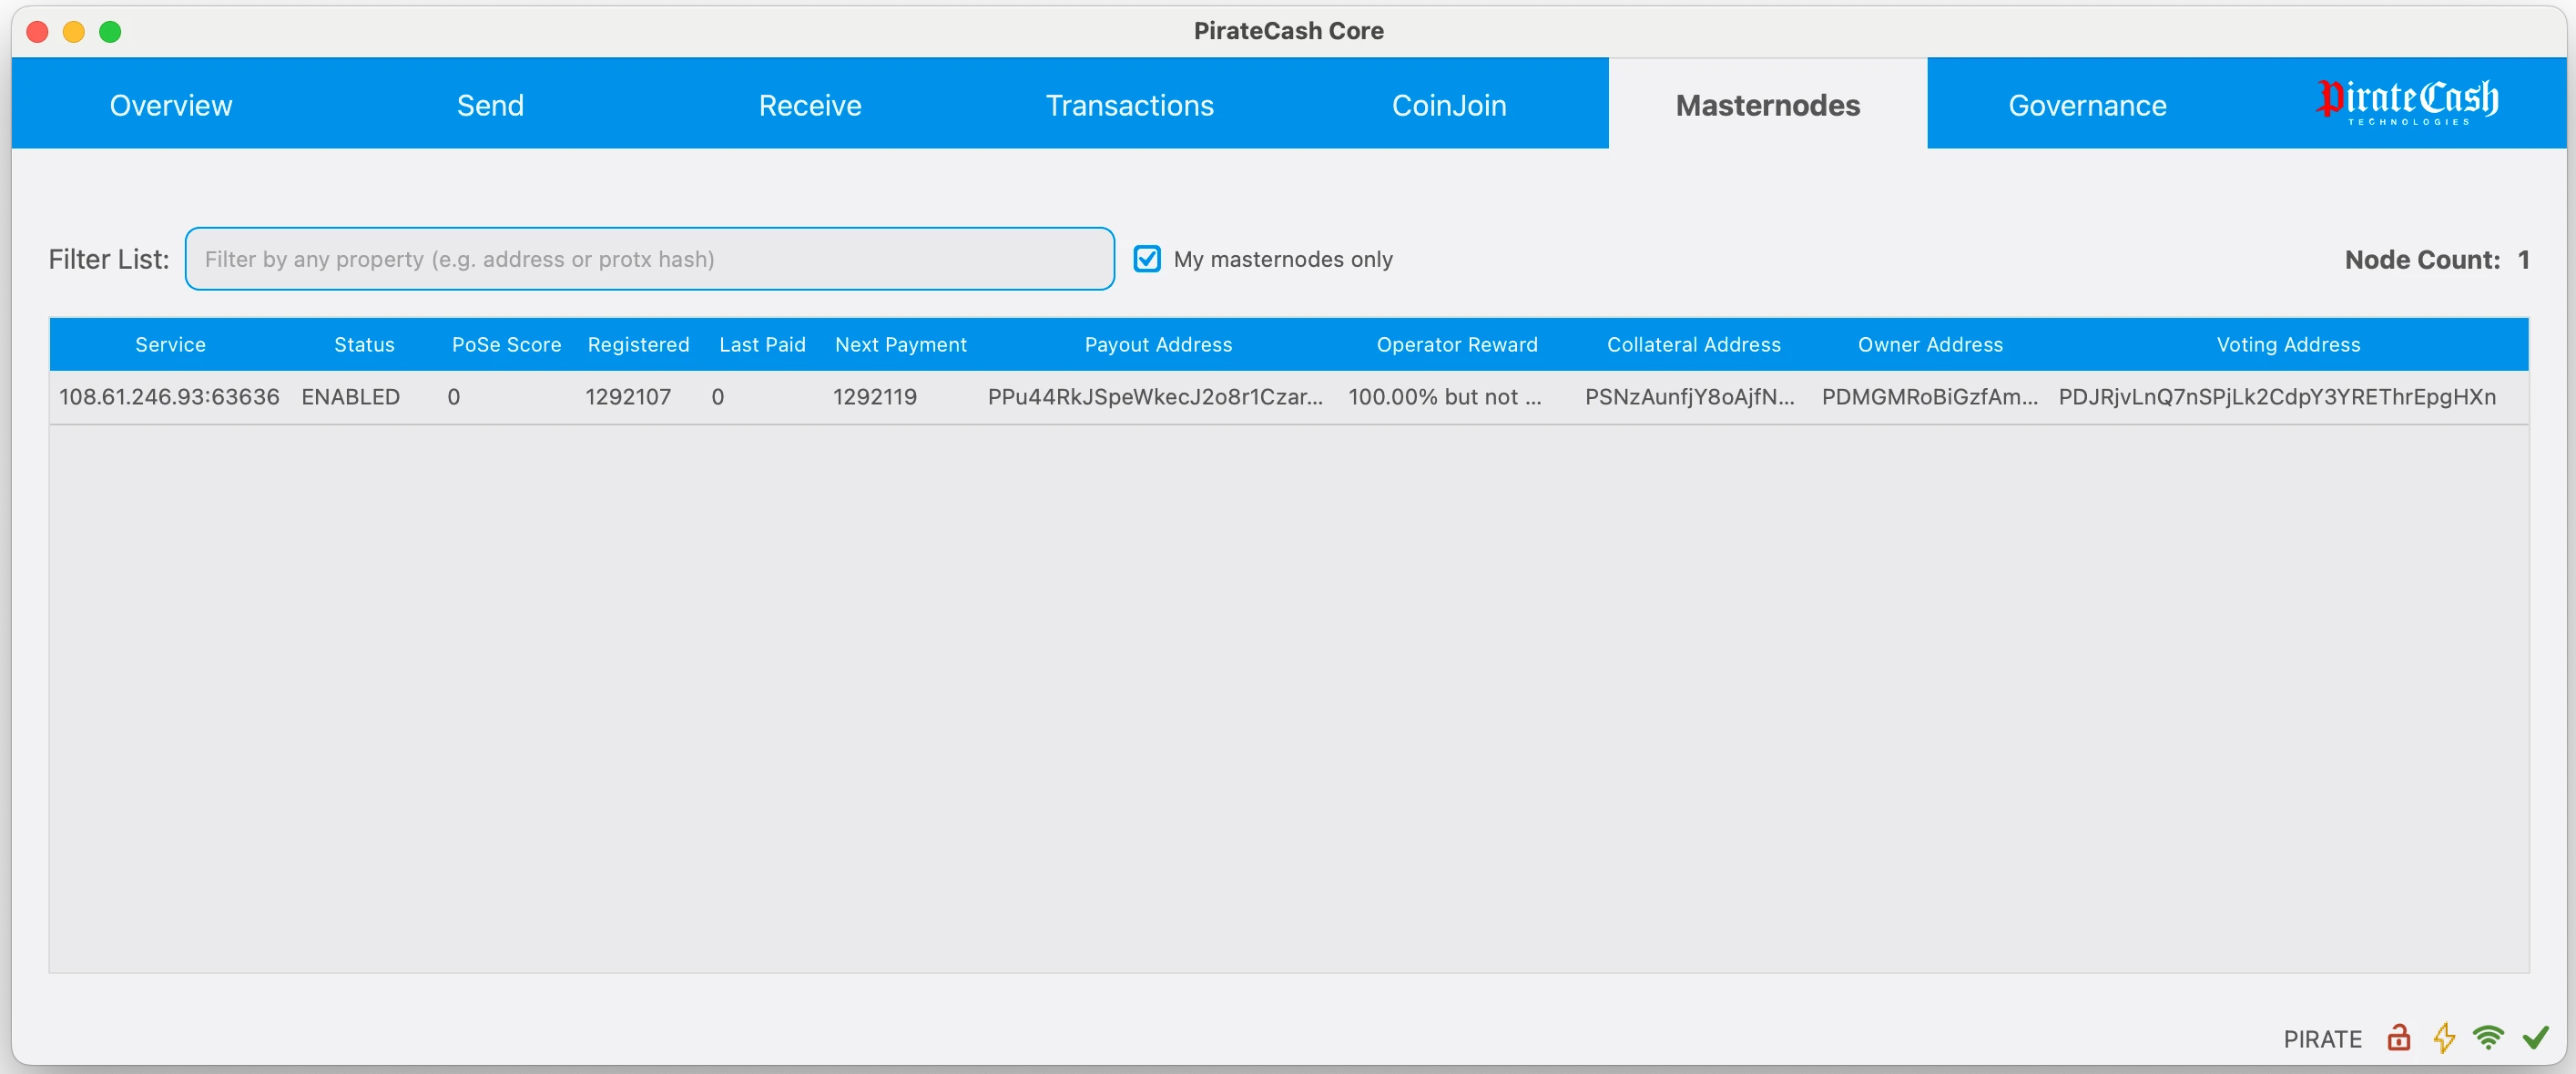
Overview
- MasterNode Statistic
- Download PirateCash core from GitHub, Prepare wallet
- Exchange to PirateCash, transfer to your wallet, then pay yourself EXACTLY 10 000 PIRATE
- Create a Linux Droplet
- Connect to Droplet via PuTTY for Windows/Terminal for Mac
- Edit masternode configuration file's
Download PirateCash core from GitHub, Prepare wallet
- Unzip PirateCash Core file to the location of your choice. You will run the wallet from this location.
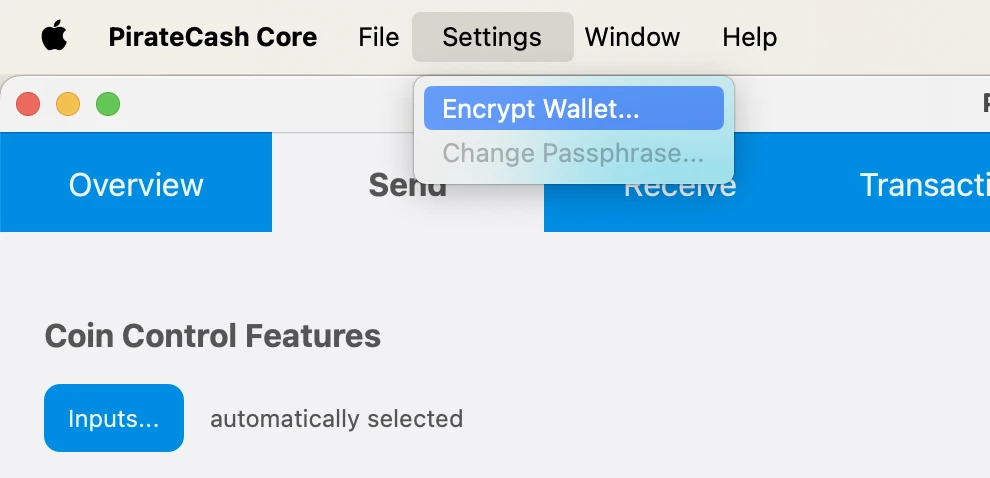
- Encrypt your wallet: Settings -> Encrypt Wallet. Choose a password. Write it down. Restart your wallet.
- Backup Wallet: File -> Backup Wallet
Exchange anycoin to 10 000 PIRATE
Exchange a minimum of 10 001 PIRATE.
You need an address with EXACTLY 10 000 for a Masternode.
NOTE: You’re exchanging more because:
- Exchanges charge you for withdrawals
- When you send 10 000 PIRATE to yourself there is a small transaction fee.
- Create a receiving address: Receive -> New address Send PIRATE from exchange to your wallet.
- Create an additional address for your PirateCash: Receive -> New address, label this address mn1
- Copy this address, Click Send tab, paste address on the “Pay To:” line.
- Type 10000 in the Amount: field. Click Send
Create a Linux droplet on DigitalOcean
- Register for an account, create new “droplet” – Digital Ocean’s term
- Select Ubuntu 26.04 (LTS)
- Select 2 GB/1vCPU – sufficient and only $12/month
- Select any datacenter region you like. Create!
- Write down your droplet IP address
- Check your email for initial VPS root password
Access to your droplet
Access VPS via PuTTY – this will allow you to copy and paste commands to your VPS. The web console will not. Mac users can use Terminal. Launchpad -> Search -> Terminal -> Type: ssh root@IP
- Download and install PuTTY
- Default settings are fine. Type IP address in Host box, Type a name your session, click Save for easy future access. Click Open to connect.
- Login as root. Find DigitalOcean email with default password. Copy and paste your password. You can paste in PuTTY with a right mouse click. NOTE: when pasted, your password will be INVISIBLE. Just hit enter.
- Upon first login you will be prompted to choose a new password. Write it down.
Create a Swap File:
fallocate -l 1G /swapfile
chmod 600 /swapfile
mkswap /swapfile
swapon /swapfile
echo "/swapfile none swap sw 0 0" >> /etc/fstab
Masternode configuration file setup
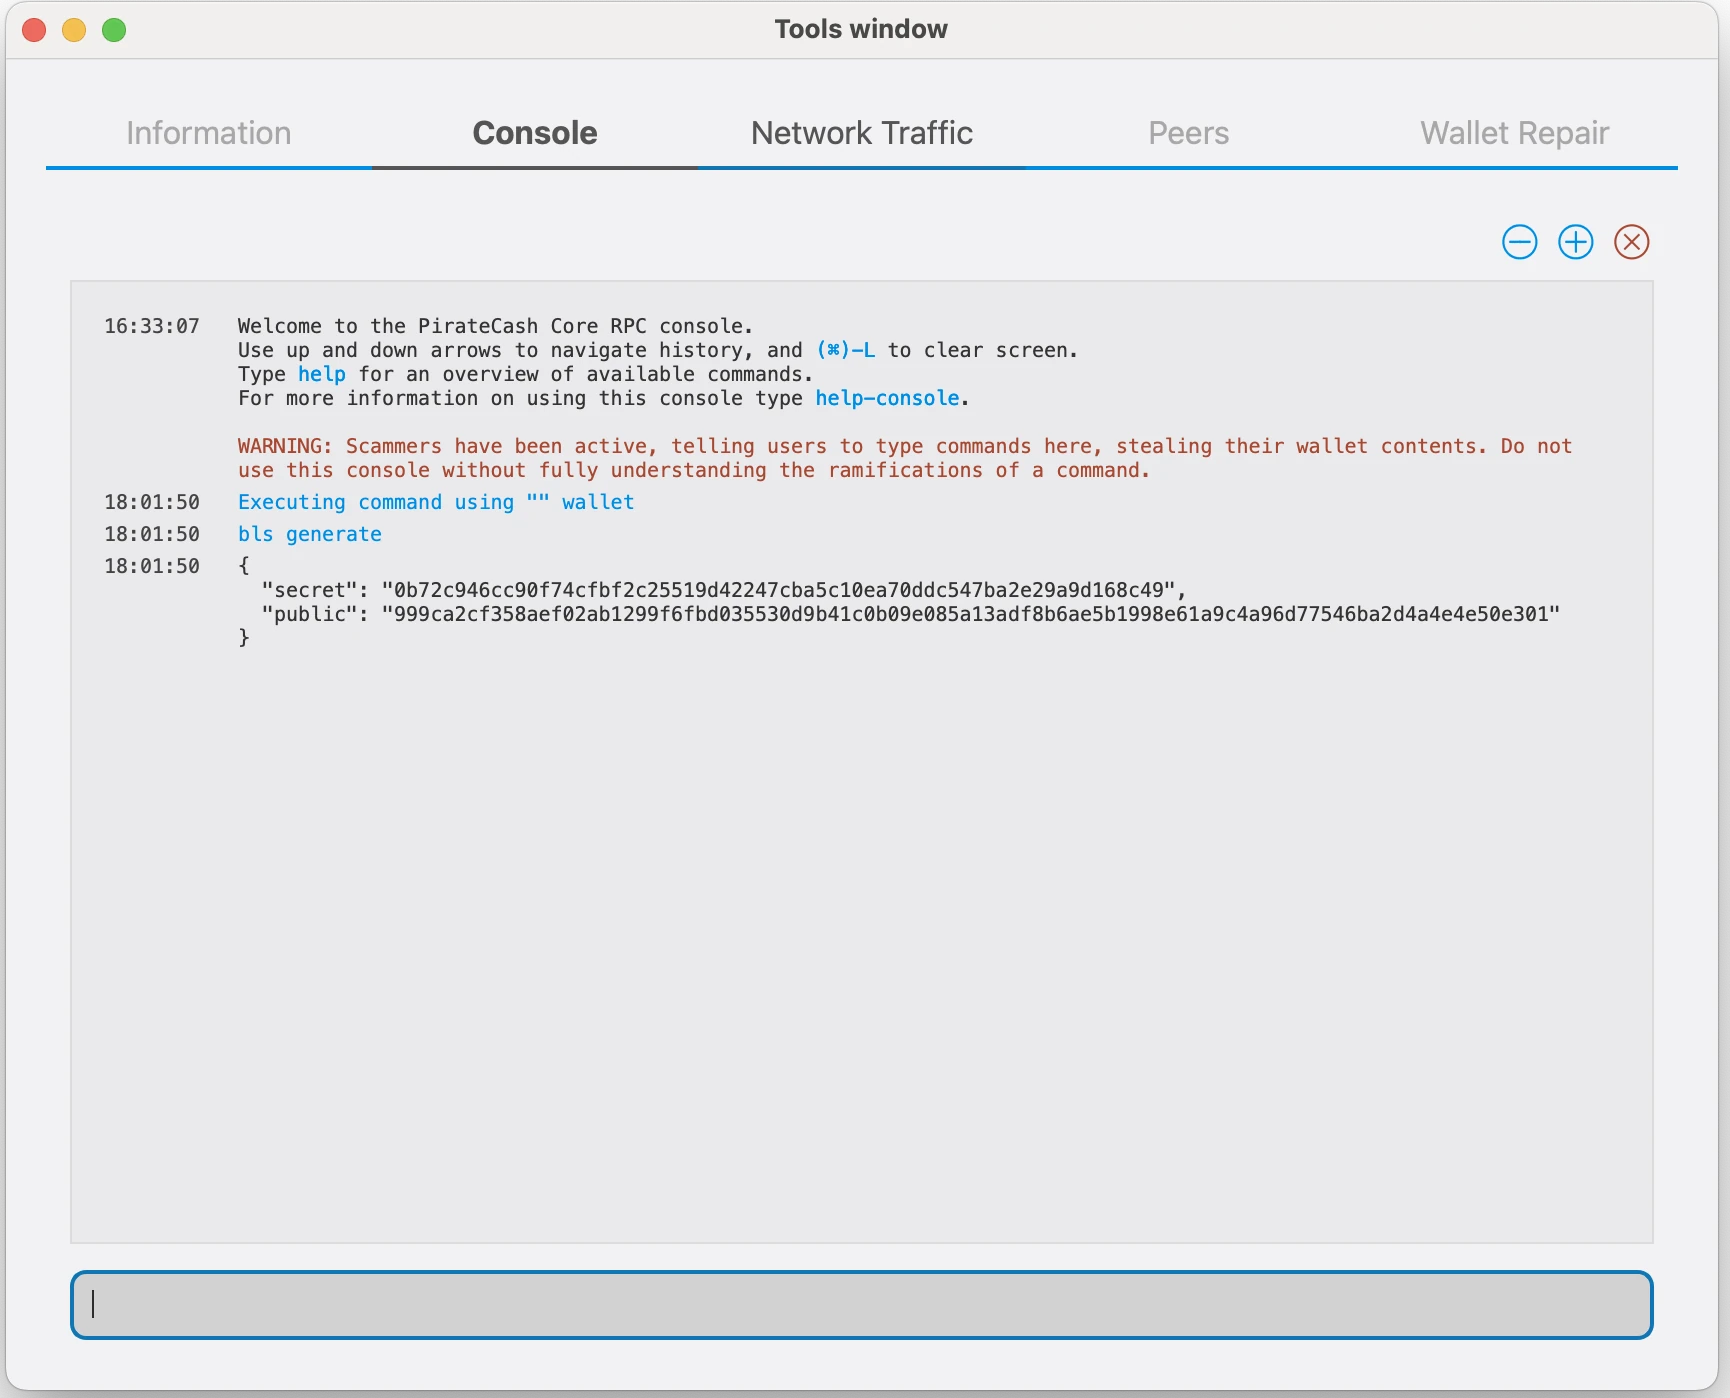
- Enter RPC console: Window –> Console
- Type: bls generate
- After generating the BLS key, the easiest way to configure the node is to use the script from our masternode repository.
Automatic setup from the masternode repository
- Purchase 10,001 PIRATE, for example on PancakeSwap.
- If you already have tokens, exchange them for native PIRATE via @piratecash_bot.
- Launch a server with a hosting provider, for example via this hosting link.
- Access the server via SSH.
- Clone the repository: https://github.com/piratecash/masternode.
- Generate a BLS key in PirateCash with bls generate. Insert the secret value into masternodeblsprivkey=xxx in /home/pirate/.piratecore/piratecash.conf inside Docker or /opt/node/piratecash/piratecash.conf on the host system.
- Run ./install_masternode.sh for automatic setup.
- Restart Docker.
- Activate the masternode via PirateCash Core, then continue with the activation steps below.
Updating an existing automatic masternode
Use this section if you previously installed the node from the masternode repository. The repository file piratecash-main/piratecash.conf is only a template; the live node config is /opt/node/piratecash/piratecash.conf.
- Connect to the server via SSH and go to the repository directory, usually ~/masternode.
- Run git pull. If Git reports that local changes in piratecash-main/piratecash.conf would be overwritten, check whether you stored anything important only in that template file.
- If the values are already in /opt/node/piratecash/piratecash.conf, discard the local template change with git checkout -- piratecash-main/piratecash.conf.
- Run git pull again to download the new files, including update_masternode.sh.
- Run ./update_masternode.sh. The script updates the Docker setup, keeps or creates Corsa RPC credentials, writes them to .env and /opt/node/piratecash/piratecash.conf, then rebuilds and starts the containers.
cd ~/masternode
git status
git checkout -- piratecash-main/piratecash.conf
git pull
./update_masternode.sh
After the script finishes, check that the containers are running:
docker compose ps
If you intentionally changed only the repository template file, copy those values before git checkout -- and reapply them to /opt/node/piratecash/piratecash.conf after the update.
- Second option: manual setup. This method is more complex; use it only if you do not want to use the automatic setup script.
-
Goto to Droplet and please Download archive
wget https://github.com/piratecash/piratecash/releases/download/v21.1.1-pirate/piratecashcore-21.1.1-x86_64-pc-linux-gnu.tar.bz2
bzip2 -dc piratecashcore-21.1.1 -x86_64-pc-linux-gnu.tar.bz2 | tar -x
- Create directory mkdir ~/.piratecore
-
Create file ~/.piratecore/piratecash.conf with following content:
rpcuser=XXXXXXXXXXXXX
rpcpassword=XXXXXXXXXXXXXXXXXXXXXXXXXXXX
corsarpcuser=XXXXXXXXXXXXX
corsarpcpassword=XXXXXXXXXXXXXXXXXXXXXXXXXXXX
corsarpcport=46464
rpcallowip=127.0.0.1
server=1
rest=1
listen=1
txindex=1
listenonion=0
daemon=1
maxconnections=700
masternodeblsprivkey=ХХХХХХХХХХХХХХХХХХХ
externalip=XXX.XXX.XXX.XXX
Replace the fields marked with XXXXXXX as follows:
rpcuser: enter any string of numbers or letters, no special characters allowed
rpcpassword: enter any string of numbers or letters, no special characters allowed
corsarpcuser: enter the RPC username for the local corsa-chat service
corsarpcpassword: enter the RPC password for the local corsa-chat service
corsarpcport: use the RPC port configured for corsa-chat; the default is 46464
externalip: this is the IP address of your VPS
Please fill masternodeblsprivkey field by executing the command bls generate in console and restart piratecashd daemon.
-
Before starting PirateCash Core, download and start the Corsa daemon. Use the same RPC username and password values as corsarpcuser and corsarpcpassword in piratecash.conf:
wget https://github.com/piratecash/corsa/releases/download/v1.0.62/corsa-linux-amd64.tar.bz2
bzip2 -dc corsa-linux-amd64.tar.bz2 | tar -x
nohup env \
CORSA_LISTEN_ADDRESS=:64646 \
CORSA_BOOTSTRAP_PEERS=65.108.204.190:64646 \
CORSA_RPC_HOST=127.0.0.1 \
CORSA_RPC_PORT=46464 \
CORSA_RPC_USERNAME=XXXXXXXXXXXXX \
CORSA_RPC_PASSWORD=XXXXXXXXXXXXXXXXXXXXXXXXXXXX \
./corsa-node > corsa-node.log 2>&1 &
After Corsa is running, start the PirateCash daemon. - Start daemon: ./piratecashd
-
Click Window -> Console to open the console. Type the following command into the console to generate a new PirateCash address for the collateral:
getnewaddress MN1

-
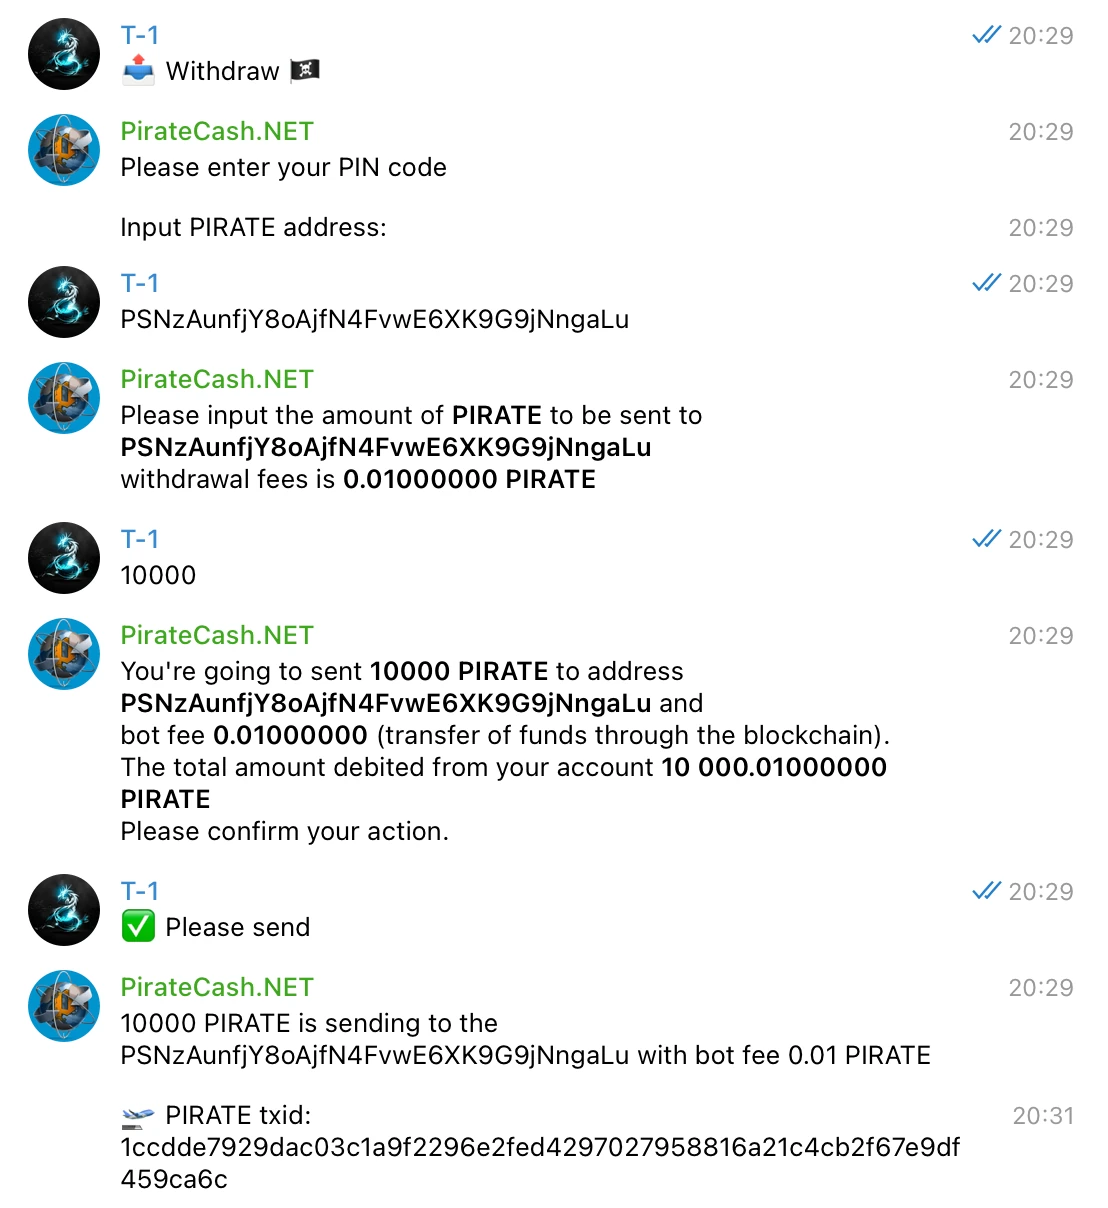
To send 10,000 PIRATE to this address via @piratecash_bot, you need to go to the 💵 Balance → PirateCash → 📤 Withdraw️ menu or execute the command /withdraw_pirate.
-
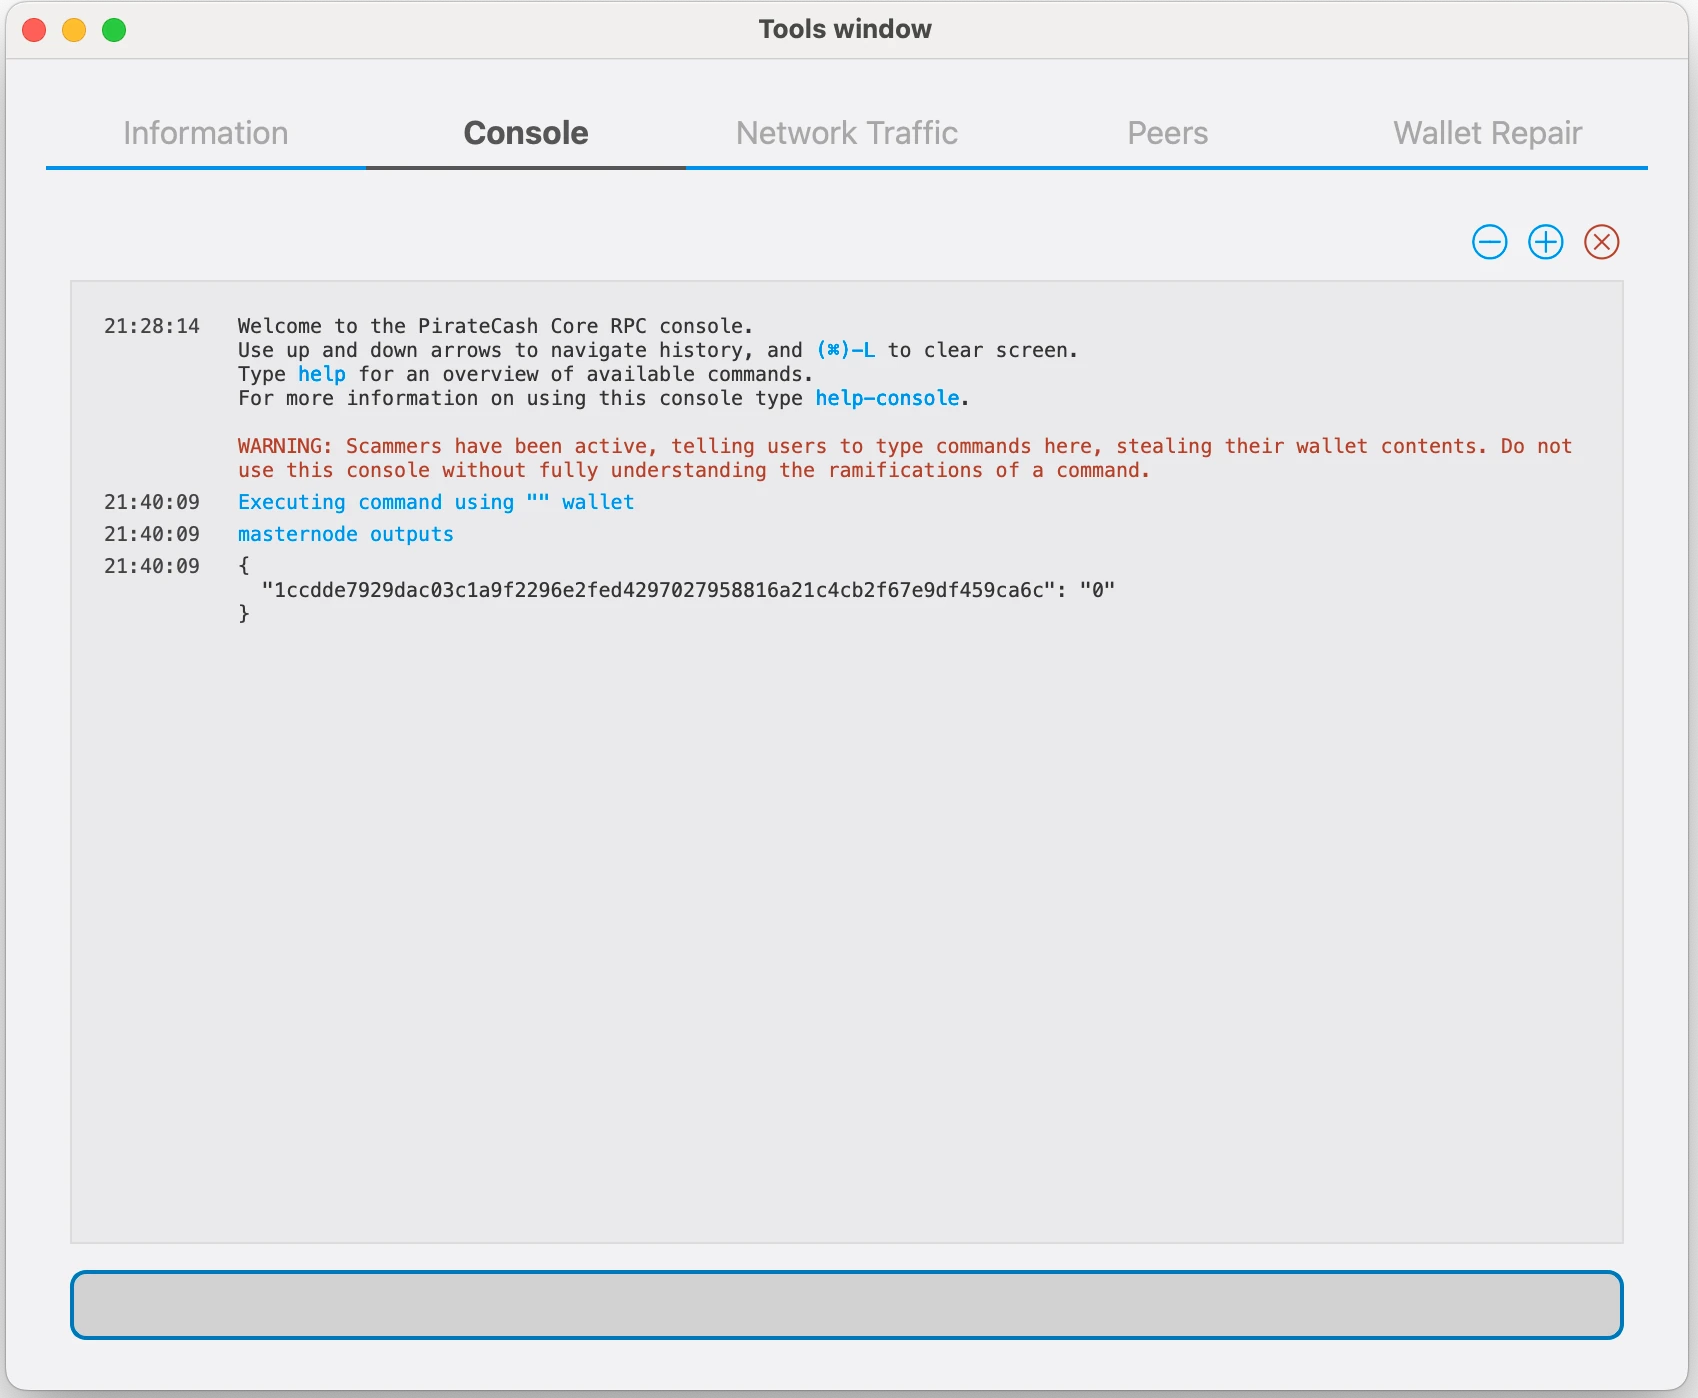
After the transaction is completed, various keys related to the transaction need to be extracted for later inclusion in a configuration file and registration transaction. This registration transaction serves as proof, recording the configuration on the blockchain and ensuring the masternode’s inclusion in the deterministic list. Please execute masternode outputs
-
Prepare a ProRegTx transaction
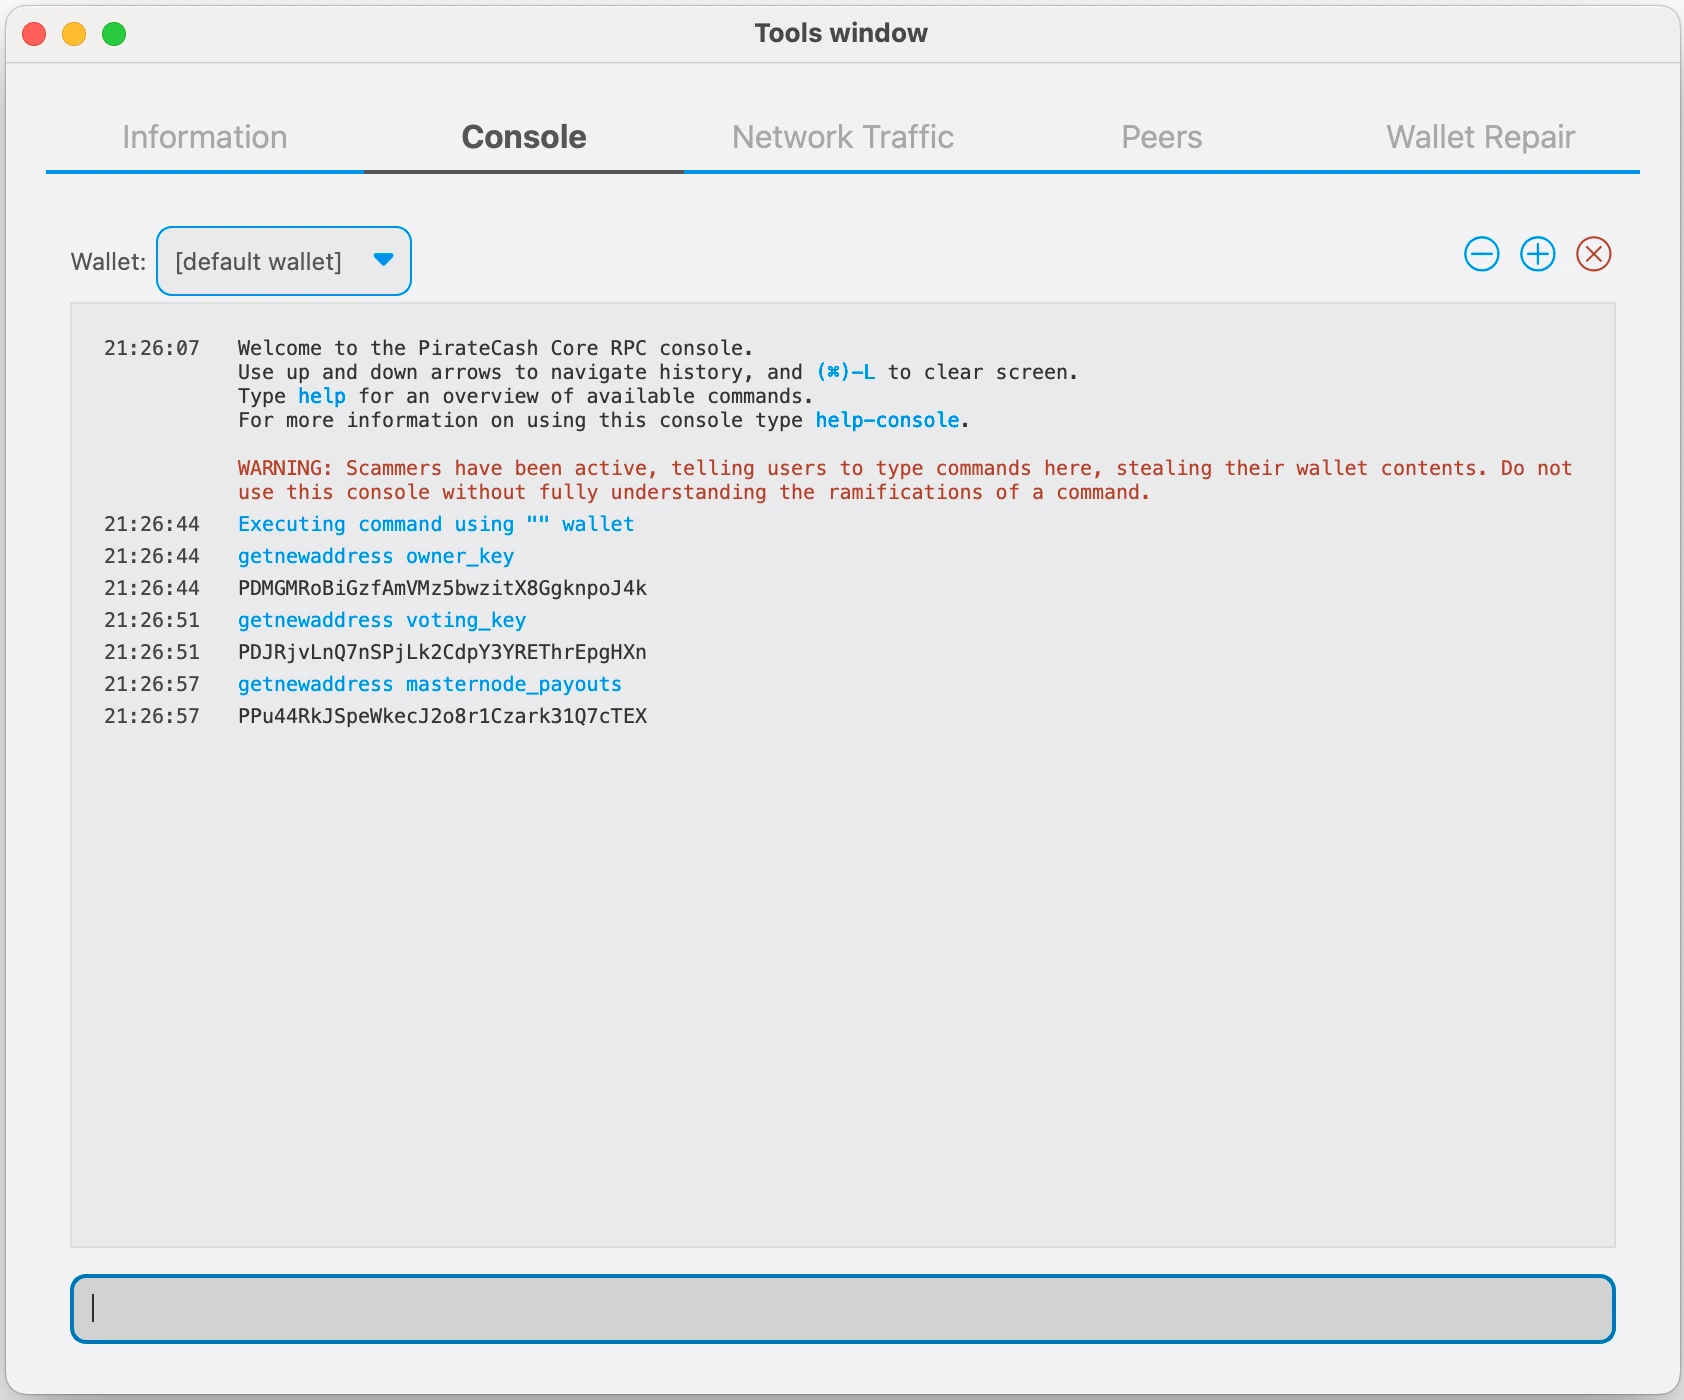
First, we need to get a new, unused address from the wallet to serve as the owner key address (ownerKeyAddr). This is not the same as the collateral address holding 10,000 PIRATE. Generate a new address as follows:
getnewaddress owner_key
-
This address can also be used as the voting key address (votingKeyAddr). Alternatively, you can specify an address provided to you by your chosen voting delegate, or simply generate a new voting key address as follows:
getnewaddress voting_key
-
Then either generate or choose an existing address to receive the owner’s masternode payouts (payoutAddress). It is also possible to use an address external to the wallet:
getnewaddress masternode_payouts
-
You can also you need to generate and fund another address as the transaction fee source(feeSourceAddress). If you selected an external payout address, you must specify a fee source address:
getnewaddress pay_fees
-
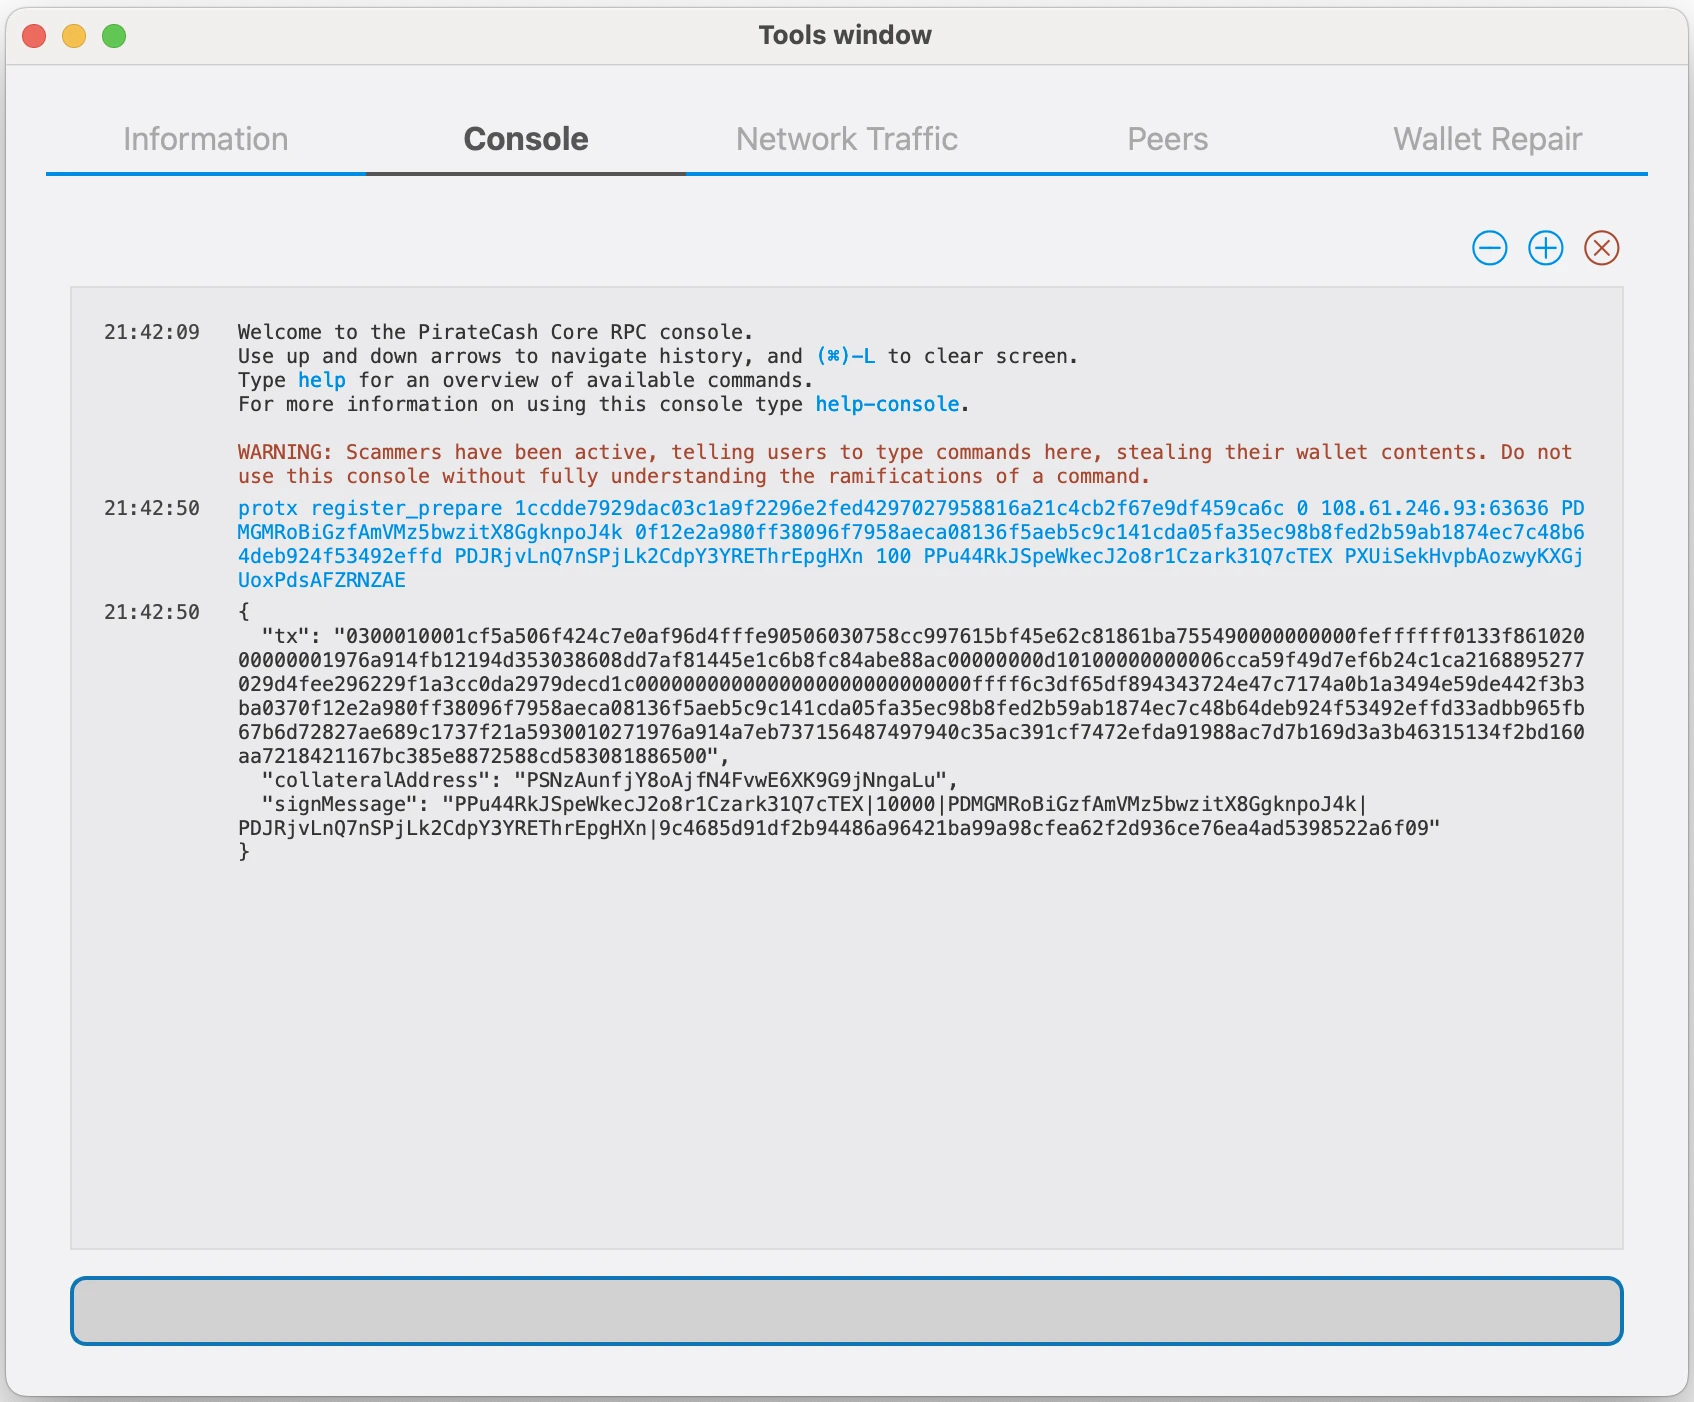
We will now prepare an unsigned ProRegTx special transaction using the protxregister_prepare command. This command has the following syntax
protx register_prepare collateralHash collateralIndex ipAndPort ownerKeyAddr operatorPubKey votingKeyAddr operatorReward payoutAddress feeSourceAddress
Open a text editor such as notepad to prepare this command. Replace each argument to the command as follows:
collateralHash: The txid of the 10,000 PIRATE collateral funding transaction
collateralIndex: The output index of the 10,000 PIRATE funding transaction
ipAndPort: Masternode IP address and port, in the format x.x.x.x:63636
ownerKeyAddr: The new PirateCash address generated above for the owner/voting address
operatorPubKey: The BLS public key generated above (or provided by your hosting service)
votingKeyAddr: The new PirateCash address generated above, or the address of a delegate, used for proposal voting
operatorReward: The percentage of the block reward allocated to the operator as payment
payoutAddress: A new or existing PirateCash address to receive the owner’s masternode rewards
feeSourceAddress: Address used to fund ProTx fee. payoutAddress will be used if not specified.
-
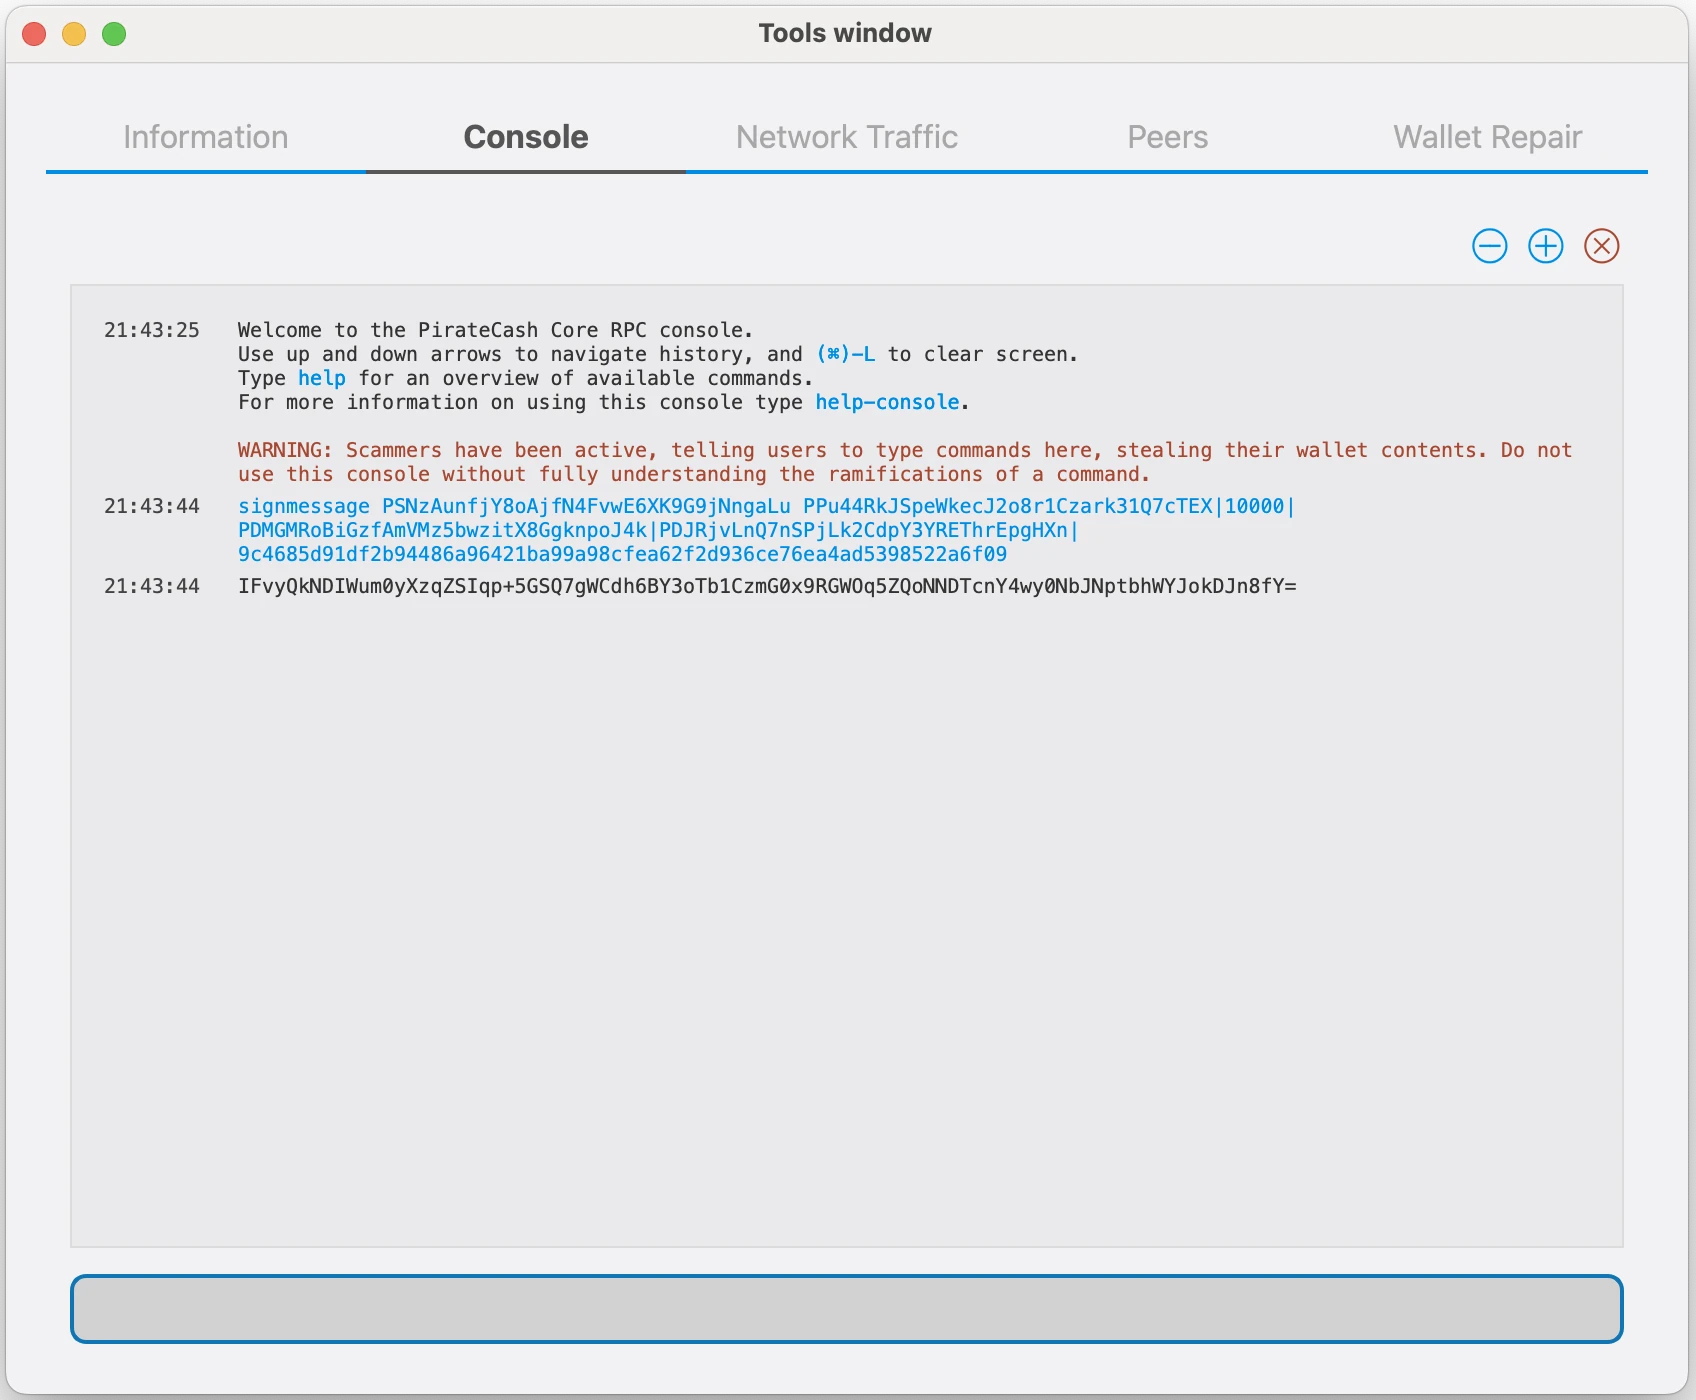
Sign the ProRegTx transaction
We will now sign the content of the signMessage field using the private key for the collateral address as specified in collateralAddress. Note that no internet connection is required for this step, meaning that the wallet can remain disconnected from the internet in cold storage to sign the message. In this example we will again use PirateCash Core, but it is equally possible to use the signing function of a hardware wallet. The command takes the following syntax:
signmessage collateralAddress signMessage
-
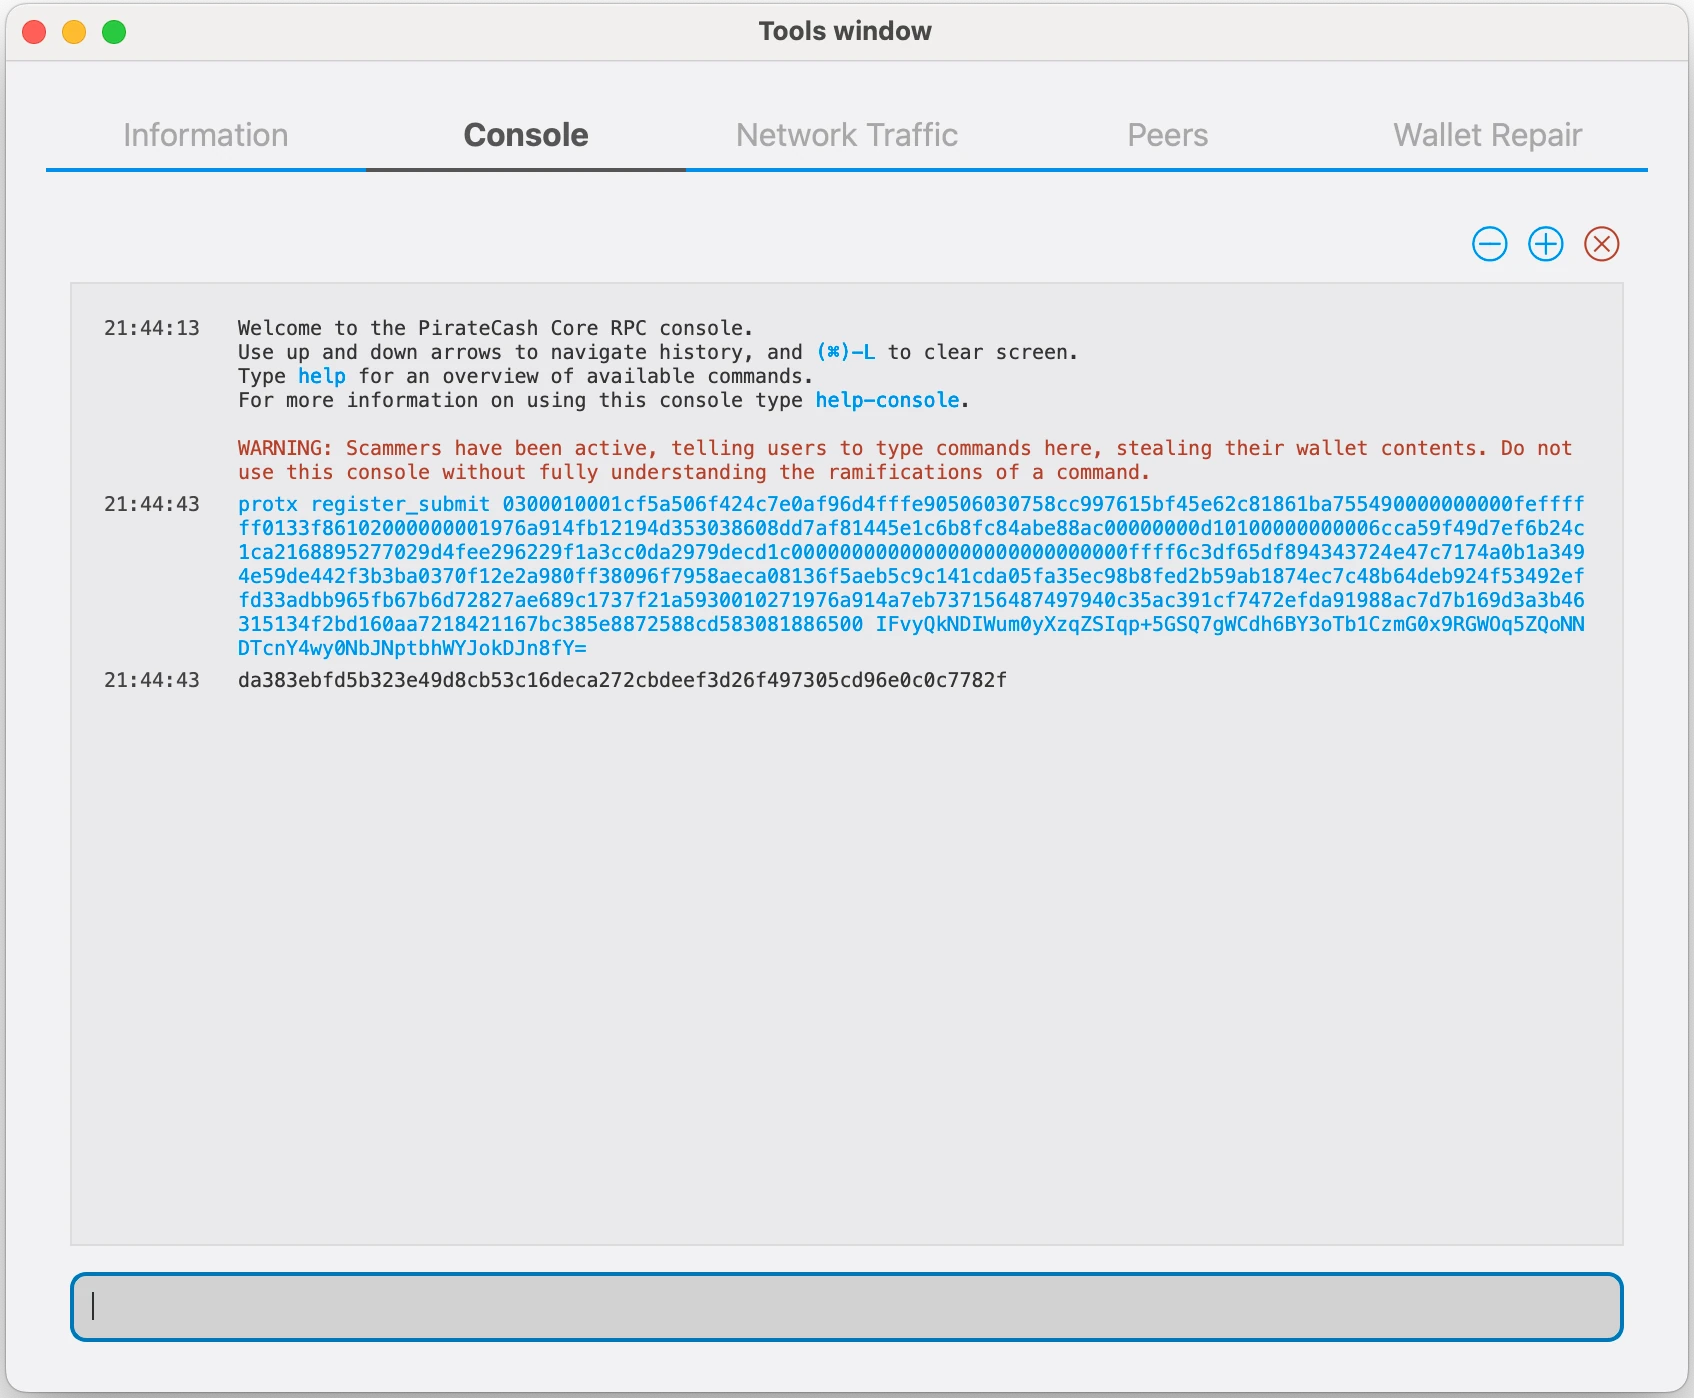
Submit the signed message
We will now submit the ProRegTx special transaction to the blockchain to register the masternode. This command must be sent from a PirateCash Core wallet holding a balance on either the feeSourceAddress or payoutAddress, since a standard transaction fee is involved. The command takes the following syntax:
protx register_submit tx sig
tx: The serialized transaction previously returned in the tx output field from the protx register_prepare command
sig: The message signed with the collateral key from the signmessage command
-
Your masternode is now registered and will appear on the Deterministic Masternode List after the transaction is mined to a block.
Corsa-chat requirement
Corsa-chat requirement for PirateCash Core v19
Starting with PirateCash Core v19, a masternode must also run a local corsa-chat/Corsa node on the same server. The automatic setup in the masternode repository configures PirateCash Core and corsa-chat together. The requirement is described in PIP-0001.
PirateCash Sentinel
Sentinel setup is no longer required for new masternodes. Sentinel support will be deprecated in PirateCash Core v20, so you do not need to install Sentinel or configure the Sentinel cron job.